plist 是内核中一种带优先级的双向链表数据结构,链表中每个元素的优先级按数值大小升序排序。plist 作为 pi-futex 的一部分补丁引入内核,初始提交链接为:https://github.com/torvalds/linux/commit/77ba89c5cf28d5d98a3cae17f67a3e42b102cc25 。本文基于 6.2-rc2 版本内核解析 plist 实现,阅读本文需要了解 kernel 中 list 数据结构的实现,因为 plist 是基于 list 实现的。
plist 是基于 kernel 中的双向链表 list 实现的,其有两个重要结构体:struct plist_head 和 struct plist_node,分别表示 plist 的 head 和普通结点,它们的具体内容如下:
1
2
3
4
5
6
7
8
9
10
11
12
13
struct plist_head { struct list_head node_list ; }; struct plist_node { int prio; struct list_head prio_list ; struct list_head node_list ; }; struct list_head { struct list_head *next , *prev ; };
struct plist_head 中只有一个 struct list_head node_list; 成员,其是 struct plist_node 中 struct list_head node_list; 的 head,这个链表包含了加入 plist 的所有结点。从 struct plist_node 结构体中看到还有另外一个会由 struct list_head prio_list; 构成的链表,这个链表可能没有包含全部的结点,因为相同优先级的结点只有第一个会加入 prio_list 中。这个链表用于加速找到要插入结点的正确位置,由于每个优先级只有一个结点会在链表上,所以这个链表的长度最长是优先级的范围。假设优先级范围为 K,在插入一个新元素时就会遍历 prio_list 链表来找到正确的位置,那么最多就只会遍历 K 个元素,这保证了插入元素算法的最坏复杂度为 O(K)。prio 成员自然就表示该结点的优先级了。
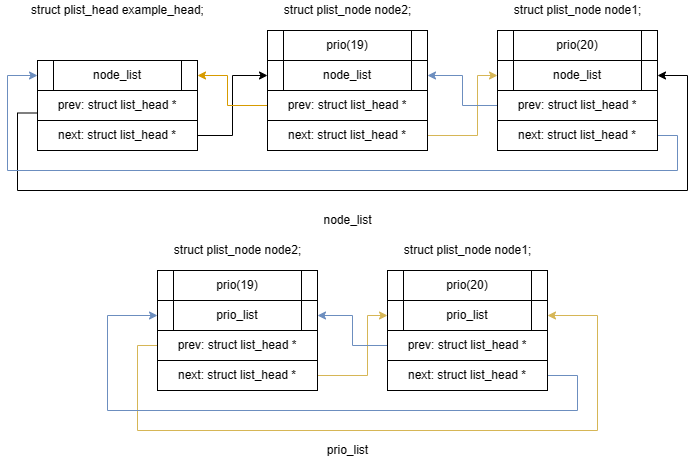
通过类似 PLIST_HEAD(example_head) 定义并初始化一个 struct plist_head example_head; 结点,我们将得到以下结构:
上图中 node_list 表示 struct plist_head 结构体中的 struct list_head node_list; 成员,prev 和 next 表示 node_list 中的 struct list_head *prev; 和 struct list_head *next;。
往 example_head 中加入一个优先级为 20 的结点 struct plist_node node1;:
往 example_head 中加入一个优先级为 19 的结点 struct plist_node node2;:
再次往 example_head 中加入一个优先级为 20 的结点 struct plist_node node3;:
根据操作方法可以分为以下几种 API:
初始化
辅助性宏/函数,如第一个结点 plist_first,下一个结点 plist_next 等
遍历
增加删除
初始化有头结点初始化和普通结点初始化两种 API,这两种又分为静态初始化和动态初始化。
头结点静态初始化有两个 API: PLIST_HEAD_INIT 和 PLIST_HEAD,而 PLIST_HEAD 是通过 PLIST_HEAD_INIT 实现的。一般使用 PLIST_HEAD 初始化一个 struct plist_head 结构体:
1 2 3 4 5 6 7 #define PLIST_HEAD_INIT(head) \ { \ .node_list = LIST_HEAD_INIT((head).node_list) \ } #define PLIST_HEAD(head) \ struct plist_head head = PLIST_HEAD_INIT(head)
具体用法如 mm/swapfile.c 中 static PLIST_HEAD(swap_active_head);。当然也可借助 PLIST_HEAD_INIT 宏来完成 plist_head 的初始化了,如 kernel/power/qos.c 中这样使用:
1
2
3
4
5
6
7
static struct pm_qos_constraints cpu_latency_constraints = .list = PLIST_HEAD_INIT(cpu_latency_constraints.list ), .target_value = PM_QOS_CPU_LATENCY_DEFAULT_VALUE, .default_value = PM_QOS_CPU_LATENCY_DEFAULT_VALUE, .no_constraint_value = PM_QOS_CPU_LATENCY_DEFAULT_VALUE, .type = PM_QOS_MIN, };
头结点的动态初始化 API 为 plist_head_init:
1
2
3
4
5
static inline void plist_head_init (struct plist_head *head) { INIT_LIST_HEAD(&head->node_list); }
一般 head 不能或者不方便静态初始化时,譬如 mm/swapfile.c 中 plist_head_init(&swap_avail_heads[nid]);。
普通结点通过 PLIST_NODE_INIT 静态初始化:
1 2 3 4 5 6 #define PLIST_NODE_INIT(node, __prio) \ { \ .prio = (__prio), \ .prio_list = LIST_HEAD_INIT((node).prio_list), \ .node_list = LIST_HEAD_INIT((node).node_list), \ }
如 init/init_task.c 中:
1
2
3
4
5
6
7
8
struct task_struct init_task = { ...; #ifdef CONFIG_SMP .pushable_tasks = PLIST_NODE_INIT(init_task.pushable_tasks, MAX_PRIO), #endif ...; };
通过 plist_node_init 来动态初始化:
1
2
3
4
5
6
static inline void plist_node_init (struct plist_node *node, int prio) { node->prio = prio; INIT_LIST_HEAD(&node->prio_list); INIT_LIST_HEAD(&node->node_list); }
如 mm/swapfile.c 中 plist_node_init(&p->avail_lists[i], 0);。
plist 中的辅助性宏/函数从功能、返回值来看可以分为三类,第一类是判断头结点或普通结点是否是空的,头结点如果是空的,表示链表是空链表,普通结点是空的则意味这个结点没有在任何一个链表上;第二类是返回值为 struct plist_node * 类型,即返回一个 plist 结点;第三类返回一个包含了 struct plist_node 的结构体地址。第二类和第三类假设 plist 是不为空的,如果在链表为空时调用这两类宏/函数,则会返回一个不正确的结构体地址,当访问这个结构体的某些成员时可能会造成内核功能紊乱或者 panic,如果开启了 CONFIG_DEBUG_PLIST,某些宏/函数会调用 WARN_ON 发出警报。
第一类有两个内联函数,分别用于判断头结点和普通结点是否为空:
plist_head_empty:
1 2 3 4 5 6 7 8 static inline int plist_head_empty (const struct plist_head *head) { return list_empty(&head->node_list); }
这个函数用于判断链表是否为空,若为空返回非零值,否则返回 0。plist_node_empty:
1 2 3 4 5 6 7 8 static inline int plist_node_empty (const struct plist_node *node) { return list_empty(&node->node_list); }
这个函数用于判断这个结点是否在一个链表上,若不在返回非零值,否则返回 0。
第二类有两个内联函数和两个宏:
plist_first:
1 2 3 4 5 6 7 8 9 10 11 static inline struct plist_node *plist_first (const struct plist_head *head) { return list_entry(head->node_list.next, struct plist_node, node_list); }
这个函数返回 node_list 链表上第一个结点,这个结点也是优先级最高的结点(值越小,优先级越高)。plist_last:
1 2 3 4 5 6 7 8 9 10 11 static inline struct plist_node *plist_last (const struct plist_head *head) { return list_entry(head->node_list.prev, struct plist_node, node_list); }
这个函数返回 node_list 链表上最后一个结点,这个结点也是优先级最低的结点(值越小,优先级越高)。plist_prev:
1 2 3 4 5 6 #define plist_prev(pos) \ list_prev_entry(pos, node_list)
这个宏的 pos 参数一定要是 struct plist_node * 类型,并且不能是第一个结点。所以调用之前要确保1.链表不为空,2.pos在链表上,3.plist_first(head) != pos.plist_next:
1 2 3 4 5 6 #define plist_next(pos) \ list_next_entry(pos, node_list)
其功能和 plist_prev 相反。这个宏的 pos 参数一定要是 struct plist_node * 类型,并且不能是最后一个结点。所以调用之前要确保1️⃣链表不为空,2️⃣pos在链表上,3️⃣plist_last(head) != pos.
第三类有两个宏:
plist_first_entry:
1
2
# define plist_first_entry(head, type, member) \ container_of(plist_first(head), type, member)
这个宏返回包含第一个结点的结构体,用法可参考 kernel/sched/rt.c 中的 pick_next_pushable_task 函数:
1
2
3
4
struct task_struct *p ;p = plist_first_entry(&rq->rt.pushable_tasks, struct task_struct, pushable_tasks);
plist_last_entry:
1
2
# define plist_last_entry(head, type, member) \ container_of(plist_last(head), type, member)
这个宏返回包含最后一个结点的结构体,用法可参考 plist_first_entry。
遍历 API 可以分为两类,第一类是每次迭代拿到的是 struct plist_node * 类型;第二类是每次迭代拿到的是包含 struct plist_node 的结构体。每一类都有三个 API。
plist_for_each:
1 2 #define plist_for_each(pos, head) \ list_for_each_entry(pos, &(head)->node_list, node_list)
从头开始遍历 node_list,pos 是 struct plist_node * 类型变量,pos 可以不用做初始化,用法类似:
1 2 3 4 5 6 struct plist_node *pos ;plist_for_each(pos, &head) { ...; }
plist_for_each_continue:
1 2 #define plist_for_each_continue(pos, head) \ list_for_each_entry_continue(pos, &(head)->node_list, node_list)
pos 是一个 struct plist_node * 类型,其一定要已经是链表上的一个结点。这个宏从 pos 的下一个位置开始遍历直到 head。用法可参考 plist_requeue:
1
2
3
4
5
6
7
8
9
10
11
void plist_requeue (struct plist_node *node, struct plist_head *head) { struct plist_node *iter ; iter = plist_next(node); plist_for_each_continue(iter, head) { ...; } ...; }
plist_for_each_safe:
1 2 #define plist_for_each_safe(pos, n, head) \ list_for_each_entry_safe(pos, n, &(head)->node_list, node_list)
这个宏可以在遍历的过程中删除 pos 结点。pos 和 n 都是 struct plist_node * 类型,n 是用在遍历内部保存 pos 的下一个结点的。用法参考:
1 2 3 4 5 6 7 8 struct plist_node *pos , *n ;plist_for_each_safe(pos, n, &head) { plist_del(pos, &head); ...; }
第二类的三个函数和第一类的三个函数功能基本一样,只不过 pos 的类型是包含 struct plist_node 的结构体类型。
plist_for_each_entry:
1 2 #define plist_for_each_entry(pos, head, mem) \ list_for_each_entry(pos, &(head)->node_list, mem.node_list)
从 head 开始遍历,用法参考 mm/swapfile.c 中 swapoff 系统调用:
1
2
3
4
5
6
7
8
struct swap_info_struct *p =NULL ;plist_for_each_entry(p, &swap_active_head, list ) { if (p->flags & SWP_WRITEOK) { ...; } }
可见,第一个参数的类型已经不是 struct plist_node * 了,而是一个包含 struct plist_node 类型的结构体指针:
1
2
3
4
5
struct swap_info_struct { ...; struct plist_node list ; ...; };
plist_for_each_entry_continue:
1 2 #define plist_for_each_entry_continue(pos, head, m) \ list_for_each_entry_continue(pos, &(head)->node_list, m.node_list)
从 pos 的下一个元素开始遍历直到 head 结点。用法参考 mm/swapfile.c 中 swapoff 系统调用:
1
2
3
4
5
struct swap_info_struct *si =plist_for_each_entry_continue(si, &swap_active_head, list ) { ...; }
plist_for_each_entry_safe:
1 2 #define plist_for_each_entry_safe(pos, n, head, m) \ list_for_each_entry_safe(pos, n, &(head)->node_list, m.node_list)
遍历时可安全删除 pos。用法参考 mm/swapfile.c 中 get_swap_pages 函数:
1
2
3
4
5
6
7
struct swap_info_struct *si , *next ;node = numa_node_id(); plist_for_each_entry_safe(si, next, &swap_avail_heads[node], avail_lists[node]) { plist_requeue(&si->avail_lists[node], &swap_avail_heads[node]); ...; }
增加的 API 是 plist_add 函数,删除是 plist_del 函数。还有一个特殊的函数,相当于优化版本的先删除再加入:plist_requeue,这个函数的用途是譬如系统中有很多个 swapfile,可能有几个 swapfile 的优先级是相同的,那么我们希望可以轮询使用相同优先级的 swapfile,具体操作就是遍历这个 swapfile 时,调用 plist_requeue 函数将当前 swapfile 置于相同优先级的最后一个,这样就可以达到轮询相同优先级的效果了。下面一一详解上述几个函数。
plist_add 源码可结合前面的示例图 来阅读,示例图除了第一步的初始化之外,后面的几步都是相当于调用 plist_add 函数来实现的。
1 2 3 4 5 6 7 8 9 10 11 12 13 14 15 16 17 18 19 20 21 22 23 24 25 26 27 28 29 30 31 32 33 34 35 36 37 38 39 40 41 42 43 44 45 46 47 48 49 50 51 52 53 54 55 56 57 58 59 60 61 62 63 64 65 66 67 68 69 70 71 72 73 74 75 76 77 78 79 80 81 82 83 84 85 void plist_add (struct plist_node *node, struct plist_head *head) { struct plist_node *first , *iter , *prev =NULL ; struct list_head *node_next = plist_check_head(head); WARN_ON(!plist_node_empty(node)); WARN_ON(!list_empty(&node->prio_list)); if (plist_head_empty(head)) goto ins_node; first = iter = plist_first(head); do { if (node->prio < iter->prio) { node_next = &iter->node_list; break ; } prev = iter; iter = list_entry(iter->prio_list.next, struct plist_node, prio_list); } while (iter != first); if (!prev || prev->prio != node->prio) list_add_tail(&node->prio_list, &iter->prio_list); ins_node: list_add_tail(&node->node_list, node_next); plist_check_head(head); }
以下是我写的一个内核模块用于测试 plist_add:
1 2 3 4 5 6 7 8 9 10 11 12 13 14 15 16 17 18 19 20 21 22 23 24 25 26 27 28 29 30 31 32 33 34 35 36 37 38 39 40 41 42 43 44 45 46 47 48 49 50 51 52 53 54 55 56 57 58 59 60 61 62 63 64 65 #include <linux/init.h> #include <linux/module.h> #include <linux/kernel.h> #include <linux/plist.h> #include <linux/kprobes.h> static struct kprobe kp = .symbol_name = "plist_add" }; static PLIST_HEAD (test_head) ;static struct plist_node nodes [5];typedef void (*plist_add_t ) (struct plist_node *, struct plist_head *) ;static int __init plist_add_test_init (void ) { int i = 0 ; struct plist_node *pos ; struct plist_node *first , *iter ; plist_add_t plist_add; register_kprobe(&kp); plist_add = (plist_add_t ) kp.addr; unregister_kprobe(&kp); for (; i < 5 ; i++) { pr_info("&nodes[%d] %px\n" , i, &nodes[i]); } plist_node_init(&nodes[0 ], 19 ); plist_node_init(&nodes[1 ], 20 ); plist_node_init(&nodes[2 ], 20 ); plist_node_init(&nodes[3 ], 20 ); plist_node_init(&nodes[4 ], 20 ); for (i = 0 ; i < 5 ; i++) { plist_add(&nodes[i], &test_head); } plist_for_each(pos, &test_head) { pr_info("pos %px, prio %d\n" , pos, pos->prio); } first = iter = plist_first(&test_head); do { pr_info("iter %px, prio %d\n" , iter, iter->prio); iter = list_entry(iter->prio_list.next, struct plist_node, prio_list); } while (iter != first); return 0 ; } static void __exit plist_add_test_exit (void ) { } module_init(plist_add_test_init); module_exit(plist_add_test_exit); MODULE_LICENSE("GPL" ); MODULE_AUTHOR("qeandzc" );
1 2 3 4 5 6 obj-m += plist_add_test.o all: make -C /lib/modules/$(shell uname -r) /build M=$(PWD) modules clean: make -C /lib/modules/$(shell uname -r) /build M=$(PWD) clean
ubuntu 20.04 下编译:
插入模块:
1 sudo insmod plist_add_test.ko
查看 kernel log:
1
2
3
4
5
6
7
8
9
10
11
12
13
14
dmesg -w [197702.665621] &nodes[0] ffffffffc184d440 [197702.665626] &nodes[1] ffffffffc184d468 [197702.665627] &nodes[2] ffffffffc184d490 [197702.665628] &nodes[3] ffffffffc184d4b8 [197702.665629] &nodes[4] ffffffffc184d4e0 [197702.665631] pos ffffffffc184d440, prio 19 [197702.665632] pos ffffffffc184d468, prio 20 [197702.665634] pos ffffffffc184d490, prio 20 [197702.665635] pos ffffffffc184d4b8, prio 20 [197702.665636] pos ffffffffc184d4e0, prio 20 [197702.665637] iter ffffffffc184d440, prio 19 [197702.665638] iter ffffffffc184d468, prio 20
删除模块:
1 sudo rmmod plist_add_test.ko
plist_del 的功能是删除一个结点:
1
2
3
4
5
6
7
8
9
10
11
12
13
14
15
16
17
18
19
20
21
22
23
24
25
26
27
28
29
30
31
32
33
34
35
36
37
38
39
40
void plist_del (struct plist_node *node, struct plist_head *head) { plist_check_head(head); if (!list_empty(&node->prio_list)) { if (node->node_list.next != &head->node_list) { struct plist_node *next ; next = list_entry(node->node_list.next, struct plist_node, node_list); if (list_empty(&next->prio_list)) list_add(&next->prio_list, &node->prio_list); } list_del_init(&node->prio_list); } list_del_init(&node->node_list); plist_check_head(head); }
plist_requeue 相当于优化版本的 plist_del,然后 plist_add。优化点在于:假设 node_list 上有 n 个和 node 优先级一样的结点,其实现的相当于 plist_add 的操作仅需要遍历 n 次。当然这个实现也未必就会比 plist_add 好,如果 n 很大,但是 prio_list 上的结点数很少,那还是 plist_add 更快。
1
2
3
4
5
6
7
8
9
10
11
12
13
14
15
16
17
18
19
20
21
22
23
24
25
26
27
28
29
30
31
32
33
34
35
36
37
38
39
40
41
42
43
void plist_requeue (struct plist_node *node, struct plist_head *head) { struct plist_node *iter ; struct list_head *node_next = plist_check_head(head); BUG_ON(plist_head_empty(head)); BUG_ON(plist_node_empty(node)); if (node == plist_last(head)) return ; iter = plist_next(node); if (node->prio != iter->prio) return ; plist_del(node, head); plist_for_each_continue(iter, head) { if (node->prio != iter->prio) { node_next = &iter->node_list; break ; } } list_add_tail(&node->node_list, node_next); plist_check_head(head); }
plist 的 debug 功能由 CONFIG_DEBUG_PLIST 控制,开启了之后, plist 会有一个单元测试模块 plist_test 对 plist 功能进行自检。此外,还有像在 plist_add 等函数中的 plist_check_head 函数,这个函数会遍历 prio_list 和 node_list,检查每个结点的 prev 和 next 值是否一致,若是不一致,只会调用 WARN 进行警告。CONFIG_DEBUG_PLIST 还会在 plist_first_entry 和 plist_last_entry 两个宏中检查链表是否为空,如果为空,也仅是 WARN_ON。